My Indoor Play Space | #mylittlehome

img_0848

I love change. My mind never switches off and is constantly thinking of all the different ways I could do things, including play space design (obvi). Not just for the folks I work with but also my own home. Our house is very small and over the last 3+ years we have worked hard towards living a more minimalist life. We aren’t there yet and we (like every other person with children) have junk, but with time, research, patience, and being able to work on so many other people’s homes, we are getting closer to creating a dream space for our family.

My boys (now 2.5 and 6.5) share a bedroom and also have a shared separate playroom. This means we can keep their room a zen toy-free space (with the exception of LEGO, but that’s for anther blog) and I can put all my brain power into creating the perfect play space for them. This room changes a lot – not just materials, but the layout too. As my boys have grown so have their needs and interests. I’ve also learnt a lot about what works and what doesn’t for them when they play alone, together, and with friends.

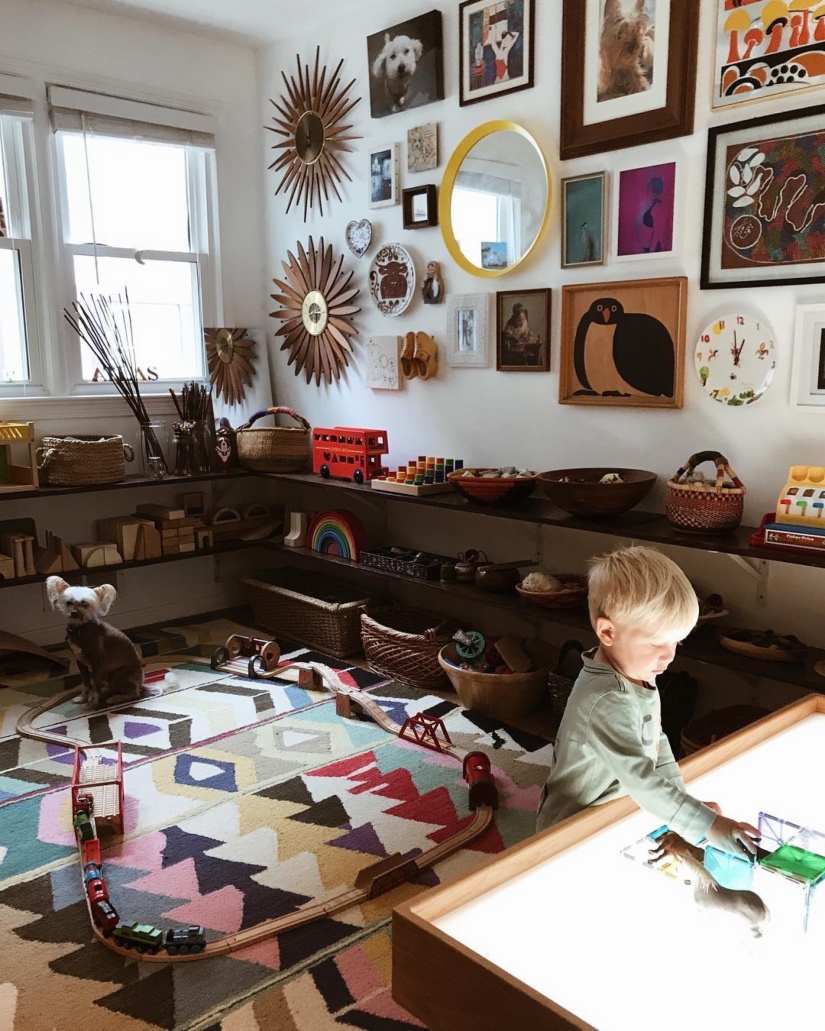
Our current set-up may be its best iteration yet. We added really simple DIY pine shelving around the room, which freed up a lot of floor space for play. I downsized what toys and materials are out, and we also created a gorgeous gallery wall with all the little pieces of art we could never quite find the right place for. It is absolutely my favorite room in the house.

…On a side note, this is how you should feel about your play space too! Children’s spaces should not be messy, junk-filled eyesores. This is not conducive to happy engaging focussed play, and it’s not nice for anyone in the house to look at. Businesses do a good job making us feel like kids need their own specific everything, from rugs to plastic colorful everything, when really all the magic, fun, and color should come from them – not the furniture or decor.

Audra’s Play Space Makeover | October 2018

Unfortunately I seem to have misplaced my final ‘after’ pics, so you’ll just have to use your imagination for this one with the pics I took while a work in progress.

Like every family who has their first baby, you start to collect an insane amount of stuff. Gear, toys, clothes, books etc – the list is long. As your little one grows you often don’t want to let go of the baby things, because what if you have another?! It’s also hard to let go of all the tiny cute baby things (I get it, I’m there). As a first time parent it can also be a bit mystifying knowing when to make that jump from baby stuff to toddler stuff.

Audra’s parents are in all those categories. Being very much a toddler now, they hadn’t made that switch yet from babyhood with her play spaces. Audra has her own bedroom, which they wanted to update into less of a nursery and more a space she could grow into. They also use their living room as a place for her to play, and they have a huge finished basement just begging to be a play space too. Budget was also a big factor, so it was important to work with what they had as much as possible.

Here’s what I did in each space.

BEDROOM

  • Removed the nursery decals from the bedroom walls and replaced with family photos, artwork, and a mirror.
  • Rearranged furniture to create a more functional footprint in the room.
  • Replaced the curtains.
  • Added a small bookshelf for additional book storage.

BEFORE

AFTER

Living Room 

  • Downsized the toys and books that were in this space and reorganized them into baskets. This made things easier to find and clean up for Audra.
  • Removed the small table and chairs to the basement space and added a coffee table (no picture of this, whomp whomp). This gave a Audra a space too work and the family an extra surface for drinks etc.
  • I also added new open ended toys like a train track and trains to this space, vs the plastic ones that were here previously.

BEFORE

AFTER


Basement

  • I removed the large plastic play pen that was serving no purpose anymore.
  • Similar to Evie and John’s play space, I used a Kallax shelf the family already had and some decals to create a little play kitchen along with toy storage.
  • Added an Ikea Raskog cart as an art cart and built a wall mounted easel.
  • Hung a large engineering print using a favorite photo of Audra.
  • Utilized the whole room to create different areas where Audra can play. The family weren’t ready to ditch the foam tiles (sigh), so we used them to delineate a little building nook like we would a real rug.
  • Added a lot more open-ended toys and materials, and removed a lot of plastic baby toys that were no longer age appropriate.

BEFORE

AFTER

Evie + John’s Play Space Makeover | August 2018

Evie (4) and John (2) have a large playroom dedicated almost entirely to them (there is a bookshelf and built-in for parent storage), which needed a little reorganization to help create more defined play spaces. Mum and dad had gathered all the bones for the room and just needed help putting them together to create a flow that allowed for more independent open-ended play, greater play arcs, and an easier time cleaning up.

This is actually a super common problem folks have, they have everything they need (usually more than need!) for a really great play space, but lack the know how on how to arrange and organize things to create a space that feels open, organized, and inviting. 

Working with their mum, this was a quick ‘swoop in and get it done in a few hours’ kind of job, with very little prep needed before I arrived. Here’s what we did:

  • Removed the large antique change table and replaced it with a 8-slot white Kallax shelf, which doubles as a little play kitchen thanks to the addition of a door in one slot and kitchen decals.
  • Moved around furniture to create a larger, more open space for building and small world play.
  • Reorganized toys to be in specific buckets/baskets – making it easier for the kids to find what they want independently and also clean up without help.
  • Used the lofted area for quiet solo activities like puzzles (a curtain will be added later).
  • Turned their Ikea Raskog cart into an art cart, which can be moved between the work table (which will have mirrors added above it) and the wall mounted easels in the other room.
  • Added a few new ‘spare parts’ to the building area, and moved art supplies onto the art cart to free up the little wooden drawers for easier spare part storage/access.
  • My favorite part of this make-over was the little kitchen we made for Evie and John. This is a great little hack if you’re limited for space/storage, but still want a play kitchen. I scored this Kallax shelf on Craigslist for $25, snagged the door at IKEA, and these decals from Amazon. Total cost: $58. Bargain!

BEFOREIMG_2523 Continue reading “Evie + John’s Play Space Makeover | August 2018”

Garrance + Gaspard’s Play Space Makeover | August 2018

Garrance (7) and Gaspard (4) have a lovely little play space in their sunroom at the back of the house. The space is dedicated to them minus half of the shelving unit which is used for general storage. They have mostly IKEA-type storage for their toys, which had become a jumbled treasure chest of materials over time that were buried deep.

Client goals:

  • Mum wanted a space that was more organized and allowed for more independence and greater play arcs.
  • Garrance wanted a place she could do art, and for it to be easier to have friends over and play.
  • They rent their home so they did not want anything attached to walls.
  • I also tackled their art storage chest, and created a little reading nook in the kids’ bedroom.

Here are the main things I did:

  • So much sorting and organizing! Garrance is an avid artist and also the owner of so many teeny tiny toys. There were totes and baskets filled with them that needed to be sorted through and organized. This is where the main chunk of my time was spent.
  • Rearranged the storage box in the room to be under the windows to free up floor space for a designated art nook.
  • Brought down the dollhouse from the kids’ bedroom as well as the small table and chair.
  • Purchased an IKEA Raskog cart to use as an art cart. Most of what was in their art storage chest was moved over here.
  • Used the two lower shelves on the large shelves for small world play toys and dress-up/gross motor storage.
  • Created a reading nook in the kids’ bedroom using a chair and cart that was already there, but I moved to the free space created when I moved the table and chair to the playroom.

BEFOREIMG_1324 Continue reading “Garrance + Gaspard’s Play Space Makeover | August 2018”

Mabel + Violet’s Bedroom Makeovers | August 2018

Y’all, this was such a fun makeover to do. While not technically play spaces, the girls’ bedrooms are their main hubs and when you’re a pre-teen and beyond, I feel like your bedroom becomes your playroom. Mabel (10) and Violet (7) were darlings, letting me into their private spaces to take creative charge. Both girls were asked about their wishes for the rooms and with this in mind I got busy with what I think is my biggest makeover yet.

Mabel’s Room

Mabel’s room was all about embracing the motto “a place for everything and everything in its place”. Things were scattered in all the wrong places, and the furniture/storage that was available wasn’t being utilized. She also wanted the room to feel more like a big kid space – the decor hadn’t been updated since she was a baby. Her request was a space for her dolls and a reading nook. Here’s what we did:

  • Moved out a surplus bookshelf and consolidated all her books onto the Kallax shelf (Mabel is an avid reader)
  • Removed everything from the desk and organized all her writing implements and notebooks before putting it back.
  • Hung a large mirror over the desk to make the room feel bigger and brighter.
  • Removed the dark curtains and replaced with brighter lighter ones.
  • Rearranged the layout of her dresser to open up the room more.
  • Removed the cupboard door and hung curtains to make more space and create a little nook for her dolls.
  • Turned the unused bottom bunk into a reading nook complete with twinkle lights, bookshelves, artworks, and new sheets and pillows.
  • Hung new artworks specific to Mabel’s interests and an IKEA Dignitet line for hanging her artwork (old artwork was removed).
  • Lots of organizing and cleaning.
  • Still to come – a custom shelf for the top bunk for Mabel’s book and drink bottle. 🙂

    BEFORE
    IMG_2002IMG_2001AFTERIMG_2547IMG_2549IMG_2550IMG_2546
Continue reading “Mabel + Violet’s Bedroom Makeovers | August 2018”

Eddie and Walter’s Play Space Makeover | July 2018

This play space makeover was all about organizing and cleaning. Eddie and Walter have some amazing toys and other resources, but everything was lost in deep baskets, out of place, spread around the house, and in total chaos. Their mum was overwhelmed and didn’t know where to start, so I came in and helped get her on the right track. They had everything I needed there, so I came armed with cleaning supplies, time, and my mini sidekicks to help get it turned around. I focused on four main areas in the end…

THE PLAYROOM

BEFORE

  • The space was crowded with too many toys and the deep baskets on the Kallax shelves meant that things were thrown in and lost in the ether.
  • The foam mat on the floor was working primarily as a dust/dirt collector.
  • The room also doubled as the kids’ clothing storage space, but the large dresser took up too much valuable play room.
  • The same went for the large armchair, which didn’t serve much purpose in the space except to house a watchful adult.
  • The artwork on the walls was years old and there were other things to mount that no one had had time to get up.

AFTER

  • I removed some of the unneeded furniture and then shifted around the furniture that was left to create more floor and counter space.
  • I sorted through all the toys and removed ones that were broken, gimmicky (think McDonalds toys), or not age appropriate (i.e. baby toys).
  • The newly sorted toys went back into baskets and were organized in the room by type to help create play areas and inspire play arcs.
  • Art supplies were placed out in the open near the newly introduced easel + work table to encourage art to happen.
  • An area on top of the shelves was created for Eddie’s STEM toys + Legos, out of the reach of baby brother Walter.
  • The foam tiles were removed and small rugs I sourced around the house  were added.
  • Old artwork was taken down and new organizational pieces put up – hooks for ukuleles, a hat rack, and a height chart (all things that were waiting to be mounted).

BEFOREIMG_1784IMG_1800 Continue reading “Eddie and Walter’s Play Space Makeover | July 2018”

Isabel + Molly’s Play Space Makeover | July 2018

Four-year-old twins Isabel and Molly’s sunny play space needed a little sprucing up. The room had lots of wonderful elements but needed more storage, more organization, and some restructured spaces with additional open ended toys.

Their mum was at her wits end with keeping the space clean and organized, especially the art supplies, and hoped the girls would expand their play interests towards the blocks. She also wanted a place the girls could read and a little space for them to explore tiny treasures (something she had seen at a friends’ house and hoped to replicate).

The play space is occasionally used as a workspace when the girls’ parents work from home, so we needed to keep their workspace/desk in the room + their books in the upper half of the built-ins.

BEFORE70d8d525-bbfd-4d5a-a150-8bae3bf2f37b
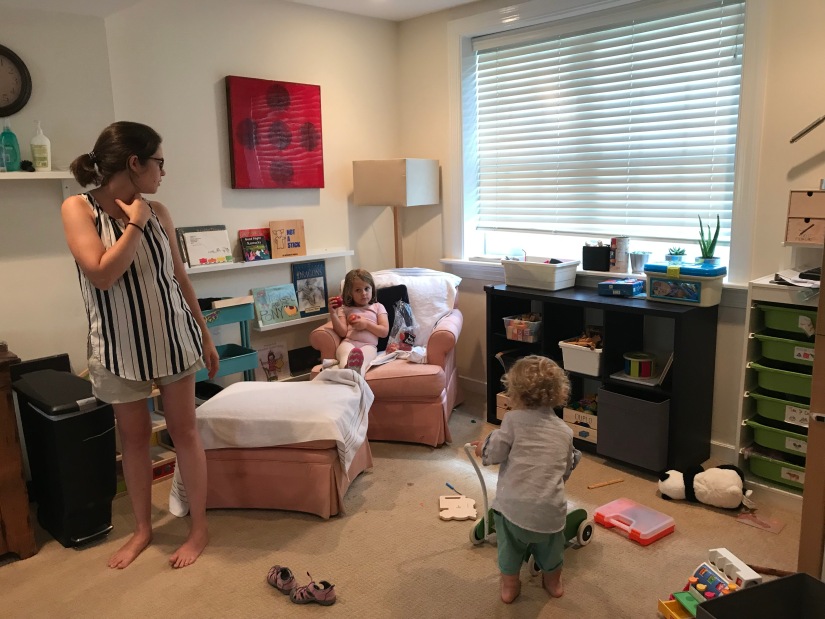
The play kitchen in the space was no longer being used productively, so we removed both the plastic kitchen and the wooden fridge to make space for a designated spot for the dollhouse (a favorite toy) and a building nook – something the twins’ parents hoped they would become more interested in.

I also created a little fine motor exploration tray (a specific request from the girls’ mum) in the same way I made this tray, only I filled it with little tiny treasures, bamboo tongs, and stacking bowls for sorting them into.

I sorted and organized the food and other accessories from the kitchen, and used two of shelves on the built-ins as a space for picnic play thanks to a picnic basket I found in the basement when cleaning up.

I also used leftover FLOR carpet tiles the family had to create a soft carpeted area for the girls’ to play on, and to designate the play space in the room. Continue reading “Isabel + Molly’s Play Space Makeover | July 2018”

Lily’s Play Space Makeover (outside) | June 2018

We finished Lily’s makeover by installing her outside mud kitchen. Originally the space beside the garage was an overgrown bare concrete slab. But with a little muscle to clean off a thin layer of concrete (thanks Eric) and expose some lovely pavers + a a good old sweep and pressure wash, it became the perfect spot for Lily to set up shop and play!

  • We created a mud kitchen for Lily using scrap wood and an old sink, which can double as a water play station by just adding a sink plug. I accessorized the kitchen with a variety of baskets, kitchen storage containers + utensils, filled with lots of greenery, rocks, water and sand. The perfect ingredients for all sorts of potions and fun.
  • On the walls we added an old mirror for visual effect and a chalkboard where Lily can draw and write out her recipes. 🙂
  • We used an old pallet to create a simple tree shape decoration, which will double as a trellis for a pot of climbing beans to grow up.
  • And finally we added bottle babies – a fabulous open ended ‘toy’ for strength building, color and light play, and pretty much anything else you want to use them for.

Annnnd of course my little assistants were on hand to help make sure the mud kitchen was in good working order before we left. 😉

BEFORE Continue reading “Lily’s Play Space Makeover (outside) | June 2018”

Lily’s Play Space Makeover (inside) | June 2018

Lily is 18-months-old and had begun to tire of her slew of store bought baby toys and her parents were at a loss at how to encourage her to engage and play for longer periods. They also wanted to create a play space that she could grow with and that was easy to organize and keep clean. They reached out for ideas/help, and here we are today – with a finished interior play space and an outside play space still to come. Below are most of the updates and changes we made:

BEFORE Continue reading “Lily’s Play Space Makeover (inside) | June 2018”